First Party Tracking
tl;dr this article explains how to use the first party tracking script

Gunnar Militz
Last Update منذ عامين
Our first party tracking relies on:
• A HTML file that has to be placed on the advertiser website
• A Javascript that has to be placed on the order-confirmation-page/Thank-you-page
The HTML file will set the 1st party cookie with our trackingID and redirect the user to the target URL on the advertisers website. This file is where all tracking links will point to. The script on the confirmation page reads the cookie and passes the trackingID back to our tracking server.
The HTML file
The following HTML file needs to be placed on the advertiser website at any path.
For example, if it is placed at https://mywebsite.com/mcanism-start.html then, the same link needs to be provided to us in the First party tracking script url, when creating or editing the campaign.
It is important that the URL that is set up in the campaign creator always corresponds with the actual location of the file. Otherwise our tracking will not work - we do not recommend changing the name or location of the file after the initial set up.
If for some reason the cookie timeout is invalid or not available, the init.js script will use 10 minutes by default.
Implementing the script
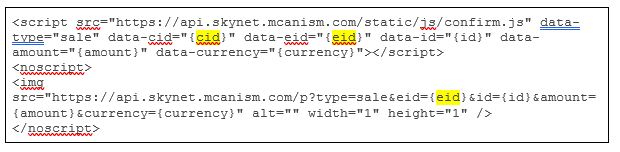
The script has to be placed on the order confirmation page(s)/Thank-you-page of your website. It should be placed as high on the confirmation page as possible to ensure it loads successfully. We suggest placing it right after the <body> opening tag.
Note: Before placing the script on the confirmation page(s), you should replace all the placeholders in the curly brackets {}.
Sale Script
Lead Script
Parameters
• {cid} (required) - Replace with 6 character sID of the campaign i. e. it is the SID of the campaign.
• {eid} - Replace with the 6 character sID of the event-ID. You can find the value in the tracking tab by creating or editing an offer.
• {amount} - Replace with the transaction amount. Do not use any thousand delimiter and use . as decimal delimiter (e. g. 1234.56)
• {id} - Replace with the ID you assign to the transactions in your own system.
• - Replace with the three letter alphabetic currency code according to the ISO 4217 standard (e. g. EUR). Only EUR is supported as of now.
2. First Party Tracking with Google Tag Manager
To use this flow described in this document, you need to have an offer that has First Party Tracking enabled.
Using Google Tag Manager to integrate first party tracking essentially involves making sure that the scripts that Mcanism offers are being placed in the right pages. Integrating this involves adding two script tags, one for initialization (the script that is supposed to save the data from mcanism when a user clicks on an affiliate link) and the other one being a confirmation script which needs to be placed on a product page so that mcanism can know about a sale/lead etc.
2.1 Google Tag Manager Setup
Create an account and follow through the setup process of Google Tag Manager including copy pasting the html code they require you to be placed on pages of your site.
2.2 Initialization Script
Now that your site has Google Tag Manager, you need to create a new Google Tag that places Mcanism initialization code at the page URL that you set in the First party tracking script url field of your Campaign. To do this, you can following these steps:
1. Click on Add a new tag on the Overview page or New button on the Tags tab.
2. In the dialog that opens up, click on Tag Configuration and select Custom HTML.
3. Paste the following code in the HTML field that is now available in the Tag Configuration box.
Click the Trigger section to set up a trigger. Triggers help you in setting up a way so the tag is added to a page only when certain conditions are met. For example, in our case we need to make sure that the user is on the first party tracking page to add the initialization script.
4. Click the + button on the top right to create a new trigger.
5. Click on Trigger Configuration section and select Page View.
6. Under This trigger fires on all Page Views.
7. You now have to setup the condition which detects if the user is at the first party tracking page. You can do that by selecting the following options Page Path, equals and under value, give it the path of the page which you set under the first party tracking script url field. For example, in case of https://example.org/hello/world?one=two, the path of the page is /hello/world.
8. Click Save on the top right and give it a name, for example, Initialization Tag.
9. Once you are back on the Overview page or Tags tab, click on Submit on the top right.
10. Give the version a name and click on Publish.
These changes might not be immediately reflected when you try to test this because some code might be cached. Please do a hard refresh before you try testing these changes.
2.3 Confirmation Script
The Mcanism confirmation script requires a few additional parameters such as the event type, Campaign ID (cid), Event ID (eid), amount and current if applicable etc, therefore, the process of creating a tag for confirmation script can be slightly different based upon how your site is setup. The simplest way is to hard-code the values in Custom HTML, but that could be a problem because multiple products might be differently priced. One other example is about eid, depending on the page, you might have to change the passed eid for Mcanism to calculate the prices appropriately. You can create Variables under the Variables tab. You can then refer to these variables from the Custom HTML and depending on how your site works, tell Google to fetch the right/applicable value for the page.
The process of creating a tag is the same as outlined in the step above but with a few changes. The path of the trigger in this case should be of the product purchase/lead confirmation page so the postback to Mcanism only happens when the event is confirmed. The Custom HTML script for this tag would be:
Sale Script
Lead Script
Please note that the value enclosed in {{}} for example, {{cid}} need to be either replaced with the actual value when creating the tag or you will have to create and use Variables with the same names on Google Tag Manager. You can read more about First Party Tracking on it's dedicated page.
Parameters
• {cid} (required) - Replace with 6 character sID of the campaign i. e. it is the SID of the campaign.
• {eid} - Replace with the 6 character sID of the event-ID. You can find the value in the tracking tab by creating or editing an offer.
• {amount} - Replace with the transaction amount. Do not use any thousand delimiter and use . as decimal delimiter (e. g. 1234.56)
• {id} - Replace with the ID you assign to the transactions in your own system.
• - Replace with the three letter alphabetic currency code according to the ISO 4217 standard (e. g. EUR). Only EUR is supported as of now.